Setting Up xBloom Studio - Ultimate Guide
The xBloom Studio is one of the most impressive Automatic coffee machine you can add to your coffee setup, but taking the time to set it up properly from day one makes all the difference.
In this guide, I’ll walk you through exactly what you’ll find in the box, what to look out for during unboxing, and how to get your Studio dialled in and ready to brew your first cup.
Getting your head around the different brewing modes, using the app and everything you need to know to get started
Whether you’re brand new to the xBloom Studio or upgrading from the earlier model, you’ll find everything you need here to feel confident and ready to brew delicious coffee.
What’s included in the xBloom Studio Box
- xBloom Studio Machine
- Omni Dripper - a reusable coffee dripper to use your own beans with via Copilot mode.
-
10x xBloom Filter Papers
- Catch Cup (Anti-Static) - Can be used to dose coffee beans and ground coffee directly into.
- xPod Dock - holds the xPods for brewing.
- Cleaning Brush
- Detachable Power Cable
- Instruction Manual & Recipe Card
If you keep all your packaging for storage or transport, the inserts make it so much easier to move the machine safely later on!
Unboxing and Handling xBloom Studio
Start by cutting the tape carefully so you don’t tear the box. Remove the top foam insert and lift the machine out with care, it’s best to grip under the sides rather than squeezing the built-in scale.
You might spot a bit of water inside the machine, don’t stress as that’s completely normal. Every xBloom Studio is tested with water before it leaves the factory, so just wipe any excess moisture off before plugging it in.
Look out for small pieces of tape on the grinder chute, reservoir, scale and drip tray. Make sure you peel these off so everything can move freely.
Plug It In and Power Up
Connect the power cable to the back of the machine, plug it into an outlet, and switch it on.
The Studio will guide you through a few setup prompts on the screen. This first setup only takes a few minutes but makes a big difference to how your machine operates.
xBloom Studio Settings
During the first boot-up you’ll be asked to select a few basics:
Temperature Units
You can choose between Fahrenheit and Celsius. If you’re following brew recipes from the specialty coffee community, Celsius is more commonly used.
Weight Units
Pick between grams, millilitres or ounces. Most people stick with grams for both coffee and water, because it’s the standard for precise recipes.
Water Source, Reservoir or Tap?
This is worth thinking about.
-
If you’re brewing at home, using the built-in reservoir is the simplest option. You just fill the tank with fresh, filtered water and you’re good to go. The reservoir is easy to remove and clean, and you won’t need any special installation.
-
If you’re brewing larger volumes or setting up a dedicated brew station, you might want to plumb the machine directly into your water line. This means you never have to refill the tank, which can be handy if you’re making back-to-back cups for guests. Just keep in mind you’ll want a good water filtration system. Poor water quality can damage your grinder burrs and affect your coffee’s flavour over time.
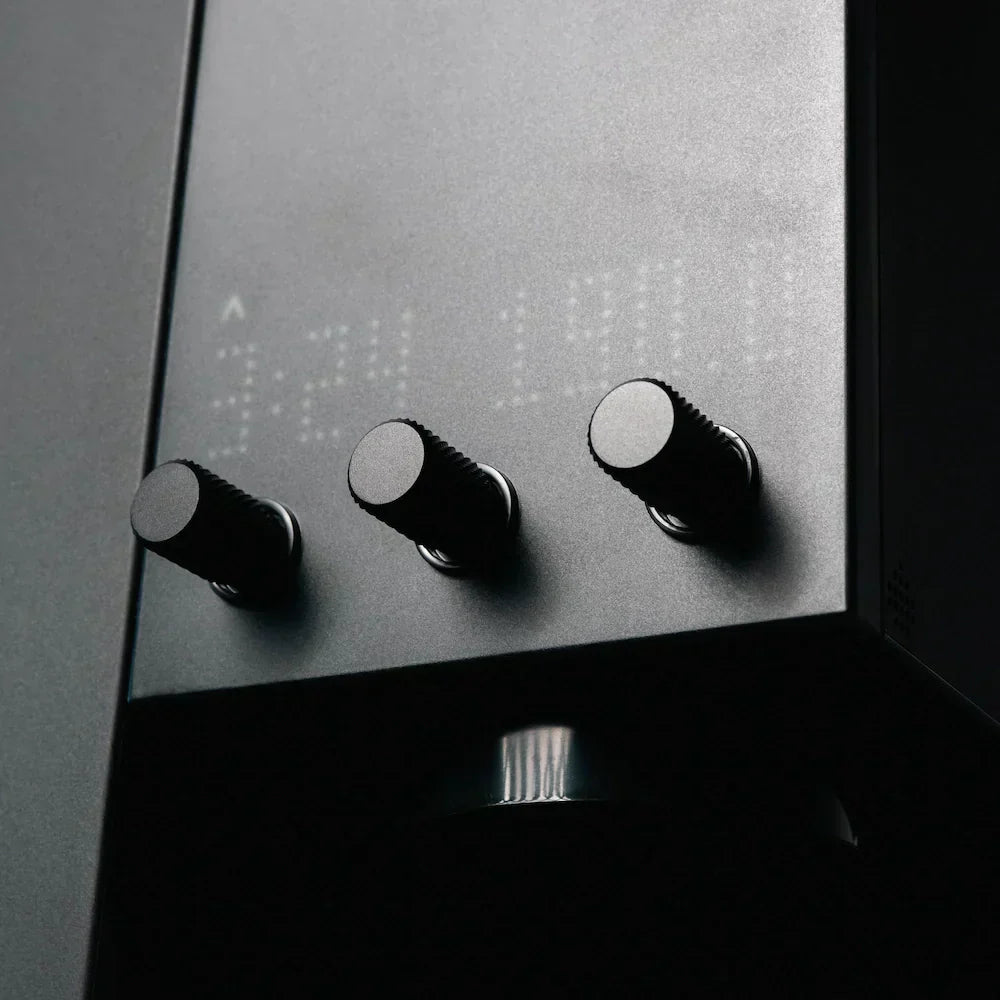
The Studio’s physical control knobs make these settings easy to navigate, turn the knob left or right to toggle through options and push it in to confirm.
The xBloom Studio comes with a built in pump, giving you the flexibility to brew using either the included water reservoir or a direct water line with 1/4" OD tubing. If you’re pulling water from a non pressurised source like a large tank of water, simply connect the tube (up to 19 inches) straight to the machine.
For setups that use a pressurised line from your home plumbing or a filtration system, xBloom has their own Water Inline Pressure Regulator to maintain safe and steady flow into your machine.
xBloom Studio Grinder Calibration
Once you’ve set your preferences, the Studio will automatically calibrate the grinder. You’ll hear the burrs adjust and see a progress percentage on the screen.
This step ensures your grind size is consistent and dialled in for the machine’s brew profiles. It only takes a minute or so, once you see the smiley face, you’re ready to brew.
Fill the xBloom Studio Reservoir
At the back of the Studio you’ll find the water reservoir. Lift the hinged lid and you’ll notice a quick grind size guide printed inside, handy for checking if you want to dial in your own recipes later on.
Fill the tank with fresh, filtered water. Using good water will help keep your machine in top shape and make your coffee taste its best. Once you’ve filled the tank, slot it back into place. You’ll feel the magnets secure it in place.

Brew Your First Coffee
One of the best parts about the xBloom Studio is how flexible it is. Straight out of the box you’ve got a few options to choose from.
Brew with xPods
If you’re keen to get going right away, start with the included xPods. Just place a pod in the dock and pop the anti-static catch cup underneath. The Studio will handle grinding, dosing and pouring for you.
Use the Omni Dripper
If you’d rather brew with your own coffee, you can. The Omni Dripper attaches magnetically to the brew head. Drop in a paper filter, add your freshly ground coffee and start brewing.
Use Your Own Brewer
Prefer your favourite Hario V60 dripper or Kalita brewer? Just remove the catch cup, slide your brewer or mug under the brew head and brew as you like.
One tip, the brew arm moves back and forth as it moves from the grinder to the water spout, so if you’re using the xPods or Omni Dripper, make sure you remove the catch cup to avoid any collisions.

What It's Like Using the xBloom Studio App
I don't like apps, I don't love the idea of having countless apps taking up space on my phone to allow me to use everyday items. So trust me when I say this, stop what you're doing and download xBloom Coffee app. The xBloom app balances a minimalistic clean design with intuitive controls and an enormous amount of controls when it comes to brewing.
Once I got my head around how to use the xBloom Studio and all the different modes I found myself using the nobs for individual settings, like when I want to just use the scales to weigh my dose of coffee. Then I use the app to tailor a brewing profile and take the controls over to my phone.
Sharing Profiles with the xBloom Studio
xBloom has always been bigger than just a coffee machine, they are building an eco system around xPods, connecting roasters to their customers and coffee enthusiasts to each other. I love this idea that now a coffee roaster can roast a coffee and serve that coffee to people inside their own homes as the coffee is intended to be expressed by the roaster.
Sharing profiles is super easy and I have even made 3 recipes that you can view and try brewing for yourself here:
Basic Barista xBloom Recipe 3 pour:
Dose: 15g
Ratio: 1:16
Pours: 3 pours
Grind Size: 40 clicks
Pour #1: 40ml 90ºc
Pour #2: 100ml 90ºc
Pour #3: 100ml 90ºc
Basic Barista xBloom Recipe 4 pour:
Dose: 15g
Ratio: 1:16
Pours: 4 pours
Grind Size: 45 clicks
Pour #1: 50ml 95ºc
Pour #2: 75ml 95ºc
Pour #3: 62ml 95ºc
Pour #4: 60ml 95ºc
Basic Barista xBloom Recipe 5 pour:
Dose: 15g
Ratio: 1:15
Pours: 5 pours
Grind Size: 50 clicks
Pour #1: 45ml 92ºc
Pour #2: 45ml 92ºc
Pour #3: 45ml 92ºc
Pour #4: 45ml 92ºc
Pour #5: 45ml 92ºc
xBloom Studio Modes - Autopilot, Copilot, Freesolo
xBloom Studio Autopilot Mode
Brewing on Autopilot is xBlooms name for utilising the xPods, pre dosed whole beans of coffee sealed in compostable pods that double as the coffee dripper.
Each pod has an NFC tag or a card with an NFC tag, simply scan the pod / card on top of your xBloom Studio, pour the coffee into your grinder and sit the xPod inside the xPod Dock.
The xBloom Studio will automatically start to brew just how the coffee roaster intended.
xBloom Studio Copilot Mode
When you want to brew with your own coffee beans you can do so using the xBloom Studio Omni Dripper. Start by pressing the right dial with the weight indicator, weigh out the appropriate dose of your coffee beans with the built in scale.
Continue setting up the xBloom Studio by adding the dose of coffee into your grinder, adding a xBloom Filter Paper into the xBloom Omni Dripper and attaching the Omni Dripper into the xBloom studio. Add a cup or server underneath the Omni Dripper. (and of course please make sure your xBloom's water reservoir is full! )
Next open up the xBloom Coffee app, select and start brewing your preferred recipe. The xBloom Studio will take it from here, it will start grinding your beans and brew your coffee.
xBloom Studio Freesolo Mode
In FreeSolo Mode, you can run the grinder, brewer, or scale independently, giving you total control over each part of the brewing process. Whether you just need to grind beans, make a quick tea, or measure a precise dose of coffee, you can use each module solo.
xBloom Studio Pro Mode vs Auto Mode
You can also change the settings on your xBloom Studio so that the 3 nobs that normally display 'Grind, water, weigh' can instead display 'A, B, C' These letters correlate directly to preset recipes. This means that if you're making the same coffee time and time again you can set each of the three dials to different recipes.
To toggle between 'Pro Mode' and 'Auto Mode' simply press the middle dial 3 times.
How To Clean the xBloom Studio
Good maintenance is key to getting the best out of any coffee gear, maintaining the xBloom studio doesn't take a lot of work however to keep your xBloom studio in it's best form we recommend:
- Use the provided brush to sweep out stray coffee grounds from the grinder chute.
- Rinse out the drip tray regularly, it pulls apart for easy cleaning.
- Wipe down the outside with a damp cloth to keep it looking fresh.
Descaling your xBloom Studio is very important, especially if you're using tap water or if your water has high mineral content. You should regularly descale your xBloom every 3 months or 300 brews (whichever comes first) and if you are using hard tap water it is recommended to descale your xBloom Studio even more regularly.
How To Descale your xBloom Studio:
- Prepare by placing a large empty heat proof container under the water dispenser of your xBloom.
- You can use either descaling powder or a descaling liquid, make sure to follow the descaling chemicals instructions.
- Go into the Brewer mode (middle nob) with the water drop icon.
- Wait for the water temperature to display and press the same middle nob 3 times.
- When the display shows 'Ready' check you have added the correct descaling chemicals to your reservoir and you have the jug positioned under the spout.
- Click the nob on the right to start the descaling process.
Make sure to rinse the water tank reservoir well after completing this process and I even like to run some additional hot water through just to be safe. Always stress caution when handling descaling chemicals, cleaning chemicals and hot water. Avoid using vinegar and commercial descaling chemicals as this may void warranty. Read xBlooms guide here.
Brewing Tea with the xBloom Studio
I love drinking tea and yes xBloom hasn't left out the tea drinkers, the xBloom Studio has it's very own xBloom Omni Tea Brewer for making tea. While this isn't included with the xBloom studio you can Buy xBloom Omni Tea Brewer separately.
Essentially this tea brewer is made of two parts, a plastic brewer and a metal filter insert, the metal insert is lightweight stainless steel filter that sits on top of the brewer.
The xBloom Studio brews by steeping the tea leaves with most of the water and then once it's time to filter a small amount of water is added, this fills the brewer to a point that the surface tension of the brewed tea starts to siphon and filter into your cup below.
This mechanical siphoning is so satisfying to watch and is a great solution for xBloom to be able to control the duration of steeping and filtering process just by adding a small amount of water to the brewer.

Potential To Dive Deeper
The xBloom Studio is designed to grow with you. Once you’re comfortable with the basics, you can experiment with grind size, RPM settings, pour patterns and endless combinations of brew recipes. The companion app opens up even more advanced features if you want to dig into detailed recipe programming.
If you’re just getting started, stick with the xPods for your first few brews, then start playing with your own coffee beans with the Omni Dripper and if you really want you can even start brewing with your own drippers once you’re ready.
Setting up your xBloom Studio properly makes all the difference to how you brew. Take a few minutes to dial it in, get familiar with the settings and experiment. You’ll quickly see why the xBloom Studio is becoming so popular.


