Kalita Wave Dripper Brew Guide
This is how we have been enjoying brewing with the Kalita Wave dripper. We tried to keep this as simple as possible yet full of relevant info that you can use to dial-in any coffee.
We plan on making an in-depth blog post on how we dial in filter coffees but this blog post will be more of a brew guide tailored for a beginner / intermediate barista.
Hope you enjoy and if you end up trying these recipes share your experience with us on our socials here.

You will need:
- 1x Kalita Wave Dripper (155)
- 1x Kalita Wave Filter (155)
- 15g Filter Roasted Coffee Beans (and a way to grind them)
- 250ml of coffee brewing water
- Gooseneck kettle is not necessary but preferable
- Server or cup to brew into and drink from
- Any coffee brewing scale that displays time & weight in grams

Water:
We have been enjoying using Aquacode for our filter coffees, Aquacode is a liquid mineral concentrate that you can add to distilled water or even soft tap water to make your own coffee brewing water.
We like to use 1 sachet of Aquacode to 5L of Distilled water, if you live in Australia most Woolworths sell Pureau water in 10L casks which seems to be the most cost effective and widespread way to source this.

Filter:
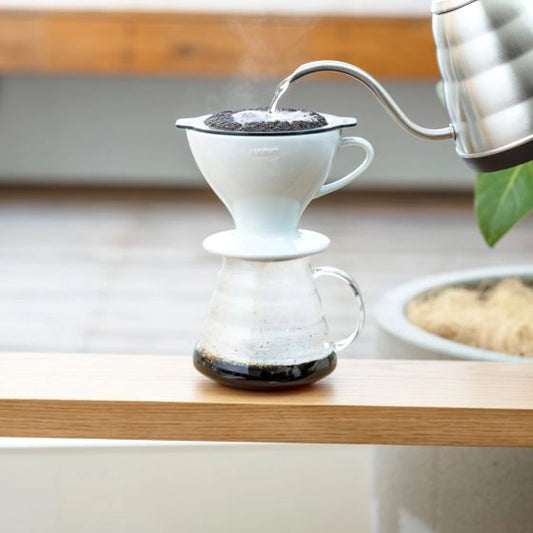
For this brew we will be using a Kalita Wave Filter and in the size 155, this is the perfect size for 155 Stainless Steel Kalita dripper we will be using.
When it comes to setting your filter we find it easiest to push your filter all the way down until the base of the filter is flush with your dripper, then hold your filter in place on the edges and start pouring water through from the centre and working your way out to the edges from the bottom to the top. Unfortunately Kalita filters (especially in the 155 size) are prone to folding inwards when wet, we found pre-wetting your filter this way helps to alleviate this issue.

Recipe:
- Grind your 15g of coffee at 22-25 Clicks and set your filter by fitting it in your Kalita Wave Dripper and running some hot water through. Add your ground coffee to your dripper and shake it to even out the bed of coffee.
- For this recipe we will be doing 5 stages, this works out to be 5 x 50g pours. When approaching a new coffee I like to start off by using the same amount of water for each stage pours and then adjusting depending on the taste and what tastes I want to bring out from that coffee.
- First Pour: At a medium pace, pour 50-60g of water over your grounds aiming to cover all of your dry coffee and saturate your bed. I find that pouring quickly on the first and second pour doesn't matter too much as it is more important that the bed is consistently wet rather than slowing down the pour and missing the grounds.
- Second Pour: Again at a medium pace, pour an additional 50-60g of water over your grounds and aiming to cover any darker patches that surface. Depending on your coffee, freshness and type of roast you may find that between the second and third pour a creamy orange colour will form at the surface. The darker patches will surface and the contrast of colour helps to target these areas. All pours are done in a circular motion aiming to be at a consistent flow.
- For your 3rd - 5th pour slow it down, aim to create as low agitation as possible. You achieve this with a gooseneck kettle by tilting your kettle to the side and aiming to get the tip of the spout as close to the brew bed as possible.
- Brew time: Using this method you can expect your total brew time to vary between 3-4 Mins on average for filter roasted coffee. This will vary depending on the coffee you use and how well your grinder performs.

Dial in your brew:
Brewing and tasting your coffee is the quickest way to familiarising yourself with what tastes good. We all have our unique ways of enjoying coffee and being able to identify what you like is the first step of dialling in filter coffee.
After brewing your coffee give it a taste and think about what tastes good and what doesn't taste good. To effectively dial-in your coffee it is important that you only change one variable at a time. These are arguably the most common factors to identify when you are dialling-in your brew.
 Kalita Tip:
When you finished brewing and you first lift off your dripper from your server / cup, tilt your kalita over you server so that any excess coffee trapped in the dripper is drained.
This is common for liquid to not completely drain due to the flat bottom design.
Under-extracted coffee will usually taste thin, weak, sharp and resembles a tea-like mouthfeel. To counter under-extracted coffee, grinding finer will usually do the trick.
Over-extracted coffee is often perceived as a bitter taste, 'hollow' and 'dry'. this is caused by either the water and coffee brewing for too long and/or the Coffee is way too fine. To counter this you will first want to grind coarser
Stale coffee beans can be easily identified when your hot water first comes in contact with your coffee grounds, usually fresh coffee will bloom and bubble up on the first pour. Lighter roasts tend to not bubble up as much and lower water temperatures will also result in less bubbles. There is no universal fresh period for coffee beans and depending on a wide range of factors (Beans, Roast, Storage etc) this will determine how quickly your beans will age.
Fresh coffee beans are awesome, however coffee needs to age. It is best to ask your roaster for how long they recommend to age your coffee from the roast date. Most roasters recommend drinking your coffee 1 week after roast date, however if you are drinking your coffee and it is still too fresh you can expect to 1- see way too many bubble when brewing and 2- taste a boring cup of coffee, weak and shallow with very little flavour.

Above image sourced from (Barista Hustle)